Small Kitchen Renovation on a Budget Part 3: Final Reveal
To see the process, see: Part 1 / Part 2.
Ta-da! Here it is! Our little modernized cottage-y kitchen themed in wood, greenery and steel. This kitchen now sets the tone for the rest of the home and I’ve been drawing our colours and textures from here, like a painter’s palette. I’m super pleased to show you a little tour of our new home’s heart.

Source: @studioplants
Open-Concept Living
The reason we were redoing our kitchen with urgency is because our main floor is open-concept: it’s right beside Waldek’s workspace and diagonal to the couch. It’s integrated, in what I call our “social floor”, rather than sequestered into its own room where the cook is isolated from the fun. Because of that, it was important that the kitchen not just function as strictly utilitarian, but brought out a sense of invitation. It had to be friend-friendly, which meant guests should be able to freely grab glasses from the open shelves and use our counters and appliances without having to feel like they had to ask for permission.
The Details
I tried to be thoughtful with every detail that we did so here’s a breakdown of all the little bits and bobs from the kitchen, right down to what items I like to keep on our counters. In the future, I’d love to do an interior shelving organization post, but for now we’re focused on the outside.
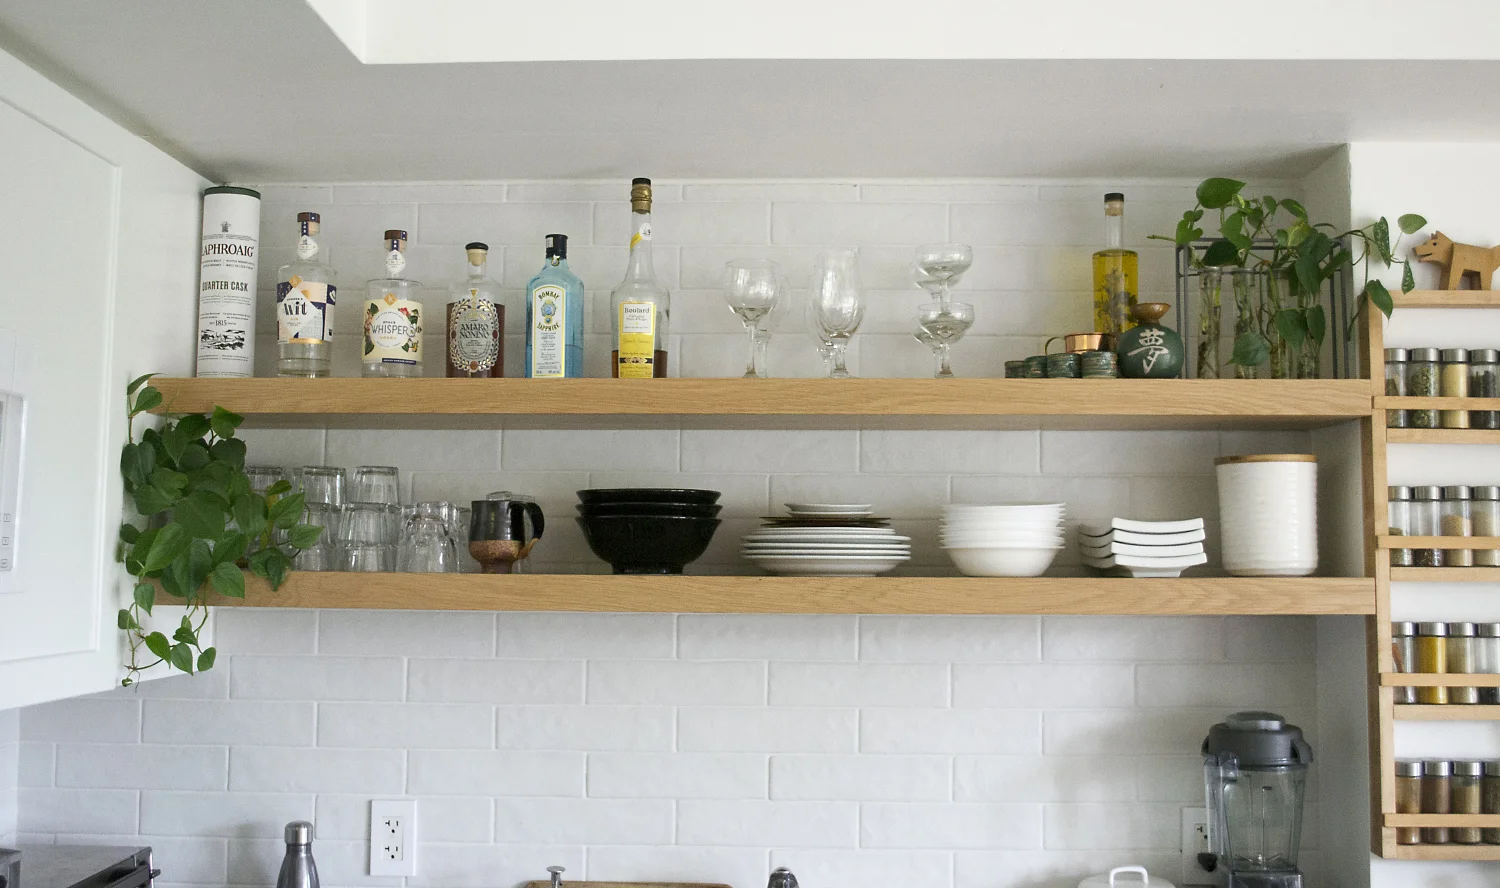
A reminder: Waldek is a bartendar which is why our shelves may be a little “boozier” than the average kitchen

Our shelves measure at 68” length x 11” depth x 2'' thickness
Floating Shelves
One reason we opted for open shelving was to display our wares. This style of shelving in a kitchen hits a line that teeters between casual and formal because they’re reminiscent of both shelves in a living room (casual) but also in a retail shop (formal), which I think balances out.
Our floating shelves are a white oak veneer over particle board. We decided to go with veneer because it would make the shelves immensely lighter (allotting more weight for the actual wares, which future me was grateful for as we eventually replaced our plates with vintage stoneware that is very heavy!) and cost a fraction of the price. It would still be able to be stained and finished like any other wooden piece (veneers are a thin layer of real wood, afterall), though we opted to keep it the original white oak tone.

Source: @wdwrkstudio / Shelves being constructed

Cross-section of floating shelves

Rich working on installation
We commissioned our friend Rich (from @wdwrkstudio) to do the construction and he did a stellar job. All we did was send over a few reference pictures, our dimensions and he took care of the rest, including install. For care, he advises the shelves just need to be wiped down with a damp cloth as he sealed it with a clear lacquer finish which is hard wearing.
Things On Our Counters
Obviously us opting for open shelving meant we weren’t afraid to have things visible so we carried that through to our counters - mainly for functionality sake. There’s one thing both me and Waldek dislike, and that is inefficiency, even if it’s spending a few extra seconds taking things in and out of cabinets. These seconds compound and become pretty annoying if you’re doing it daily so we decided to reject clear counters for easier mobility.

Swell / Vietnamese coffee filter

Vitamix E310 / natural loofah sponge
Some of our daily-use items are a reuseable bottle (we have a Swell) and a Vitamix E310. We went with this model of Vitamix because the smaller 48-ounce container worked perfect for our 2-person household and it came with an entry-level price.
Another reuseable we use are beeswax wraps. The brand I use is Abeego and we have it in the large and variety pack size (this replaces plastic wrap). We also now have a large wooden cutting board that stays out at all times. This makes prepping for meals so much easier - if you have the counter space I really recommend having this. Our is a 30” board from Catskill.

Abeego “large” wrap / Catskill 30” cutting board
Spice Rack
Unfortunately, before people ask where to buy this, this was actually a custom spice rack that Waldek made! It’s constructed out of cedar and leftover wood from our garden trellis. He made it to fit our column exactly and measured the shelves to accommodate Ikea’s ÖRTFYLLD spice jars. Technically, spices don’t last as long when stored in open light, but we decided that despite this, it was worth having them out and accessible. To see their beautiful colours out in the open also made them more inspiring to cook with.

New custom spice rack custom fitted to a central column

Ikea ÖRTFYLLD spice jar
What Are Those Plants?!
Just to keep things tidy, all the plants I have are in containers or vessels without drainage. Our kitchen has south-facing windows close by but it doesn’t get much direct light (it’s bright indirect all day however). So I went with my trusty heartleaf philodendron, pothos and there’s a bird’s nest fern on the counter too.
On top of our fridge, we have a Click & Grow self-watering grow system for edibles all-year round (we have the Smart Garden 9 but it comes in a smaller Garden 3 size too). And a quirky bonus is that we actually use our smart garden as a “lamp” at night.

Heartleaf philodendron planted in thrifted milk glass

Discontinued glass vessel with pothos and philodendron cuttings

Click & Grow Smart Garden 9, slightly overgrown
A Summary
One thing I regret is not taking a before shot of the old cabinets and mirrored backsplash (I never thought I’d want a photo of something I disliked so much) but here still provides a nice progression of the reno nonetheless. I couldn’t be happier with how it turned out: every single day I look at it and know we made great decisions - that doesn’t always happen with our projects! I think Rich did such a super job with the shelves, and I love the paint color the more I look at it.

Stage 1: backsplash removal
Stage 2: backsplash install
Stage 3: paint cabinets
Stage 4: style wares and place appliances
And just in case you were wondering, no I’m not a big drinker, but Waldek is a bartender, and a really good one at that. So that’s why we have almost an entire shelf dedicated to liquor and spirits. Ask him to make you a cocktail and he’ll personalize it for you like a nice pair of tailored trousers.
The kitchen is very much his space and being that he’s the cook in the house, what he wants is what we go with. He tells me how he likes things to function, and I organize them into systems that hopefully also looks good - that’s generally how things go around here.
A Lived-In Kitchen:
When I was preparing to shoot this space, I wanted to portray a realistic presentation of our kitchen. That mean minimal styling -“styling” for me was clearing the sink and wiping the counters clean. And, keeping all the actual appliances we use no matter how un-photogenic they may be. Yes, we always have our cream-coloured pan out (our meals are mainly home-cooked): so does it make sense to stash it away when its constantly in use? Not for us. And absolutely, we have a little toaster oven (it saves us and energy when we use it in lieu of our full-size oven). And, totally there’s always something being dried on that rack. I just happened to make Viet coffee an hour before shooting.

What I love about our little kitchen reno is what little it took to transform it so drastically. We have a “U” shaped kitchen, and the bones of it were great. Paint, a new backsplash and investing in custom shelving were our wonder pillars. We were able to save a lot by keeping much from our old kitchen: I think when people think “reno” they go “Oh, I have to rip out absolutely everything and start from scratch” because we are obsessed with new and rebirth, not editing old things we have. But actually, part of the fun and much of the creativity comes from figuring out what can stay.
You’d be amazed at what “ugly” parts you’ll end up loving when the neighbouring counterparts are refreshed. That’s how I felt about our red granite countertop: I hated it when I first saw it, but now I love it with our sage cabinets. And I never thought stainless steel would be part of my finished plan, but I appreciate the rigid metal against the soft wood and tender green. Our appliances are about 10-years old and we won’t replace them until they start failing.
Renovations can come with a lot of waste so if there’s a way to refresh your kitchen without ditching it all, I say flex your mind and I’m sure you’ll come up with something.
Support my Work by Purchasing an Art Print!


Related Posts:


A cozy cottage-inspired kitchen with a modern update that’s themed in wood, greenery and steel.